
Quick Answer: PS5 DualSense stick drift is caused by worn potentiometer contacts inside the analog stick module. A full hardware calibration sequence — covering physical cleaning, contact adjustment, firmware reset, and in-system recalibration — can resolve most drift cases without replacing the controller. This guide walks through all five steps in operational order.
If you've owned a PS5 long enough, or perhaps struggled with Xbox Series X Stuck on Green Screen? Here Is How to Fix It, you know the feeling of tech failing when you need it most. You're mid-game, standing still, and your character starts slowly walking into a wall by itself. Or the camera drifts left. Or your aim floats. You didn't touch anything. The controller is doing it on its own.
This is stick drift, a hardware annoyance as frustrating as dealing with DeLonghi Magnifica S Flashing Lights? How to Troubleshoot and Reset Your Machine. And it's not a rare edge case — it's endemic to virtually every analog stick design that uses potentiometer-based position sensing, which is essentially every consumer gamepad sold in the last two decades. The DualSense is not immune, and much like how complex firmware issues plague other devices—similar to Is Your Ring Doorbell 4 Stuck in a Firmware Loop? Here’s How to Fix It—the analog modules have specific failure patterns.
What follows is not a surface-level "try recalibrating in settings" walkthrough, such as those you might find for Why Your Samsung QLED Keeps Flickering: Advanced Fixes Beyond Factory Resets. This is a structured technical analysis of why DualSense drift happens, what's actually occurring at the hardware level, what the five-step calibration process actually does to each failure mode, and where each step genuinely works versus where it fails. Because not all drift is the same, and treating it like it is leads to wasted time and damaged controllers.
Why DualSense Analog Sticks Drift: The Real Hardware Story
The DualSense uses a ALPS or similar OEM analog stick assembly — a plastic gimbal mechanism riding on two potentiometers, one for the X axis and one for Y. As the stick moves, a wiper (a tiny spring-loaded contact) slides across a resistive carbon track. The controller reads the position by measuring voltage across that track.
The problem is mechanical and thermodynamic. Every movement wears the carbon. Heat from extended play sessions accelerates oxidation. The conductive grease applied at the factory migrates, dries out, or clumps. After somewhere between 150 and 400 hours of play — nobody has published a peer-reviewed figure, and Sony certainly hasn't — the resistance measurement at "center" position starts returning values slightly off from the calibrated zero point. The firmware interprets these false readings as deliberate movement, a diagnostic challenge as nuanced as identifying Why Your Wi-Fi 7 Network Still Drops Packets: The MLO Problem Explained. The character walks into a wall.
There are roughly four distinct drift failure types:
- Contamination drift: Dust or debris on the resistive track creates localized resistance spikes. Cleaning often fixes this, in much the same way that routine maintenance resolves How to Fix Ecovacs Deebot T9 Error 4: Main Brush Maintenance Guide.
- Wear drift: The carbon track is physically eroded. Cleaning does nothing long-term.
- Oxidation drift: The wiper contact has oxidized, increasing contact resistance inconsistently. Electrical contact cleaner can help temporarily.
- Calibration offset drift: The controller's stored center position is slightly incorrect — this is the only type where purely software calibration actually helps.
Most real-world cases involve two or three of these simultaneously. That's what makes diagnosis frustrating, and it's why some people report "fixing" drift with a cleaning, then seeing it return two weeks later.
The Warranty Conversation Nobody Wants to Have
Before getting into the steps: Sony's official warranty position on stick drift has been inconsistent and — depending on your market — frankly problematic.
In the US, PlayStation's one-year limited warranty covers manufacturing defects, but Sony has historically categorized stick drift as "normal wear and tear" in some support interactions. There was a class-action lawsuit filed in the US in 2021 specifically over DualSense drift — Zussman v. Sony Interactive Entertainment LLC — alleging the defect was known and undisclosed. The case went through various procedural stages; Sony denied the defect was widespread. Whether that litigation materially changed Sony's repair policy in practice is unclear. Different users report different experiences calling PlayStation support, with outcomes that seem to vary by support rep, region, and how the problem is described.
If your controller is under warranty and you attempt the hardware steps in this guide, you will void that warranty. That's not a minor disclosure — it's an actual decision point. If the drift is mild and the controller is recent, call PlayStation support first. Push back if they say it's wear and tear.
If the warranty is gone, or you've already been denied, proceed.
Step 1: Functional Diagnosis Before Touching Anything
Most guides skip straight to "open the controller." Don't. Spending ten minutes on proper diagnosis determines which of the following steps actually applies to your situation.
Use the PS5's built-in stick testing: Go to Settings → Accessories → Controllers → Test Input Devices. This shows live analog stick input values. Rest the controller on a flat surface. Don't touch the sticks. Watch the input readout for 60 seconds. Note which axis drifts, how much, and whether it's constant or intermittent.
A constant, steady offset in one direction suggests potentiometer wear or a persistent calibration offset. An intermittent, jittery drift — values spiking in and out — more likely suggests contamination or a failing contact.
Also: does the drift change when you lightly press the stick inward (L3/R3)? If applying slight pressure affects the drift reading, the gimbal mechanism or the spring tension is part of the problem.
Document what you find. This matters for knowing whether Step 3 or Step 4 is doing the actual work later.
Step 2: Physical Cleaning — The Most Underestimated Step
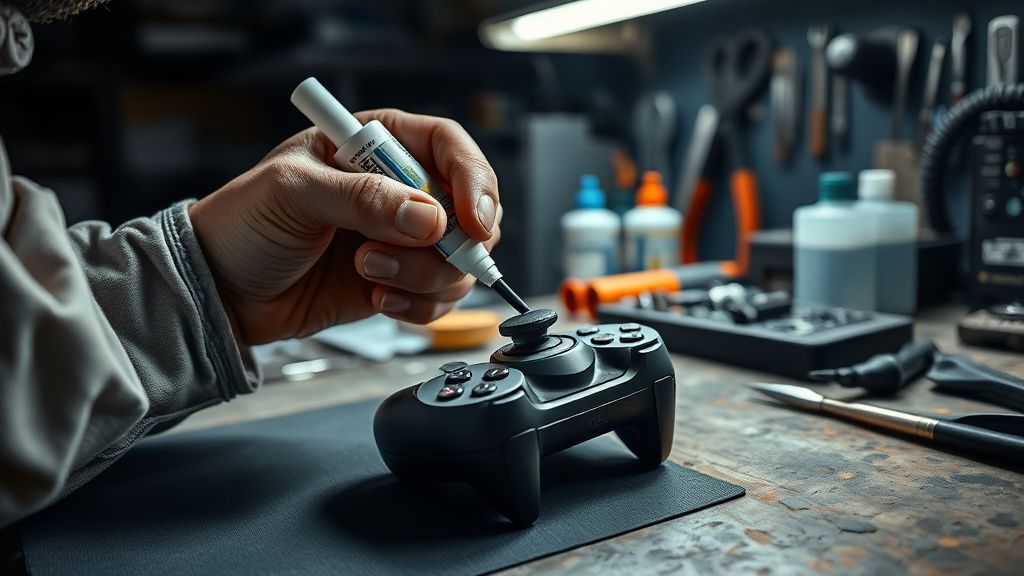
This step does not require opening the controller. It does require patience and the right materials.
What you need:
- Electrical contact cleaner (DeoxIT D5 is the community-recommended standard; generic brands work inconsistently)
- A precision applicator straw or needle tip
- Compressed air
The procedure: With the controller powered off, rotate the analog stick to its maximum extent in one direction. This exposes a gap at the base of the stick where the rubber boot meets the controller housing. Depress the straw applicator into that gap and apply a brief, controlled burst of contact cleaner — less than you think. Rotate the stick fully in all directions repeatedly for 30 seconds to distribute the cleaner across the resistive track. Apply compressed air to evacuate debris loosened by the cleaner.
Repeat this at four positions: stick fully north, south, east, west.
What this actually does and doesn't do: Contact cleaner is a solvent. It dissolves oxidation on metal contacts and displaces contamination from carbon tracks. It briefly restores electrical contact quality. For oxidation-type drift, this can produce immediate improvement. For contamination drift, it works well. For wear drift — where the carbon track is physically eroded — the improvement is temporary. You're lubricating a worn surface, not rebuilding it. Many users on r/PS5 report that cleaning provides weeks to a few months of improvement before drift returns, which is characteristic of underlying wear.
The community has a particular frustration with guides that present this step as a permanent fix. It isn't always. It's a diagnostic as much as a repair.
Step 3: Firmware-Level Reset and Dead Zone Recalibration
This is the only step that operates purely in software, and it only addresses calibration offset drift — the case where the controller's stored center position is wrong.
Controller reset procedure: On the back of the DualSense, there's a small reset pinhole near the L2 shoulder button. Use a pin or SIM card ejector to press and hold the internal button for 5 seconds with the controller powered off. This performs a factory reset of the controller's stored configuration, including its center position calibration.
Reconnect via USB to the PS5. The system will re-pair and re-establish baseline calibration on the first input recognition cycle.
The limitation: This only works if the drift is caused by a stored offset error — which can happen after a firmware update, after the controller's been dropped, or occasionally after extended high-heat sessions that cause thermal expansion effects on the sensors. If the drift is mechanical (worn potentiometer), resetting the firmware changes nothing. The hardware is still returning the wrong voltage; the system just re-records that wrong voltage as the new "center" — which in some drift cases might actually make things worse.
Some users on the PlayStation Community forums report that after a firmware reset, drift initially seems improved but returns within a day. This pattern strongly suggests the reset briefly forced a new calibration point that was closer to center, but the underlying inconsistency in the potentiometer prevents stable readings.
Step 4: Opening the Controller — Internal Physical Adjustment
This is where it gets real. If Steps 1–3 haven't resolved the drift, you're dealing with either worn contact surfaces or a mechanical issue inside the stick module that requires direct access.
Tools required:
- Tri-wing screwdriver (Y0 bit)
- Phillips #00 screwdriver
- Plastic pry tools (metal tools scratch and crack the shell)
- Tweezers
- Good lighting
Procedure overview:
Remove the back plate — there are four Y0 screws. Carefully pry the shell apart using plastic tools, working around the edges. The DualSense shell snaps, so slow consistent pressure is better than force at one point. The battery is connected by a ribbon cable on the right side; disconnect this before proceeding.
The trigger mechanisms will likely fall loose when the shell separates. Note their orientation.
The analog stick modules are mounted to the main PCB. Each module is held by small solder points. Without reflowing solder, you cannot replace the module — but you can access the mechanism for cleaning and spring adjustment.
With the internals exposed, apply a small amount of contact cleaner directly to the base of the stick module and rotate the stick fully. Use compressed air to clear debris. At this point, visually inspect the stick module's centering spring. If the spring is deformed or has migrated from its seat, it can cause mechanical resistance that translates to drift-adjacent behavior — the stick doesn't return fully to center under the spring force alone.
Carefully reseat the centering spring if it's displaced. This requires tweezers and patience. The spring is small and will launch across the room if you're not deliberate.
Replacing the potentiometer module: If you have soldering experience, the analog stick module can be desoldered and replaced with a Hall effect-based aftermarket module. Hall effect sensors use magnetic fields instead of contact resistance — they don't wear out in the same way. These modules (brands like GuliKit are commonly discussed in the modding community) represent a genuine long-term fix, not a calibration patch. The procedure requires intermediate soldering skill and the correct module for the DualSense PCB variant.
This is not a beginner step. But it's worth naming because it's the only intervention that actually addresses wear drift at the root cause.
Step 5: Post-Repair In-System Calibration and Monitoring
After reassembly, the controller needs to re-establish its calibration reference with the PS5 system.
Procedure: Connect via USB. Navigate to Settings → Accessories → Controllers → Adjust Analog Sticks. This is available in some system firmware versions; if it's absent, it may have been added or removed in a subsequent firmware update — Sony's UI decisions here have been inconsistent across versions.
If the calibration UI is not available, the system performs passive calibration automatically on the first session: simply leave both sticks in the neutral position for 30 seconds after connecting, let the system read the baseline, then gently cycle both sticks through full circular motion three times.
Return to Test Input Devices and run the 60-second drift observation again. Compare the output to your Step 1 baseline. Quantify whether drift amplitude has decreased, increased, or changed character.
Monitoring protocol: The community consensus — built largely through observation threads on r/PS5 and persistent GitHub issues on DualSense mapping libraries used for PC — is that drift cases resolved through cleaning alone tend to reappear within 2–8 weeks. Drift resolved through hardware spring correction tends to remain stable longer. Drift resolved through firmware reset can reappear almost immediately if the potentiometer is inconsistent.
If drift returns within 48 hours of a complete reset, the potentiometer is worn. The only durable fixes at that point are module replacement or a new controller.
Field Reports: What Actually Happens in Practice
The gap between guides like this one and real-world outcomes is significant. Here's what the community actually reports:
On the PS5 subreddit, threads about stick drift consistently generate hundreds of responses with wildly inconsistent experiences. User after user reports performing cleaning steps and seeing two weeks of improvement followed by return. "Cleaned it twice, still drifts, bought a new one" is practically a genre of post at this point.
A persistent frustration in the community is that Sony's official repair service often returns controllers that drift again within months — anecdotal reports suggest that Sony's repair process may be re-calibrating rather than replacing modules. There's no confirmation of this, but the pattern is repeated often enough in forum threads that it's worth noting.
The r/consolerepair community has developed a fairly sophisticated triage methodology around DualSense drift, with active maintainers sharing notes on which module batches seem more prone to early wear. The Hall effect mod has become increasingly mainstream there — it went from "advanced niche mod" to "standard recommendation" in approximately 18 months, which says something about how unsatisfactory the standard repair options are.
The counterpoint — and it deserves acknowledgment — is that many users do experience complete resolution from cleaning and firmware reset, with controllers remaining stable for extended periods. These cases are real. They're just not the cases where people return to the forum to post an update.
Counter-Criticism: Does Hardware Calibration Actually Work?
There's a genuine debate in the repair and enthusiast community about whether the non-modular steps in guides like this are worth pursuing, or whether they're rituals that provide the illusion of repair.
The honest answer is: it depends on the failure type, and most users don't know which failure type they have.
Critics of the "clean and reset" approach — vocal in hardware forums — argue that it extends the lifespan of a worn component by a few weeks while delaying the user's decision to actually replace the module. They have a point. Carbon track wear is progressive; cleaning doesn't reverse it. If you're six months post-cleaning and the drift is back, you've spent time and money on contact cleaner while your controller degraded further.
Proponents argue that for intermittent or contamination-based drift — which is not rare, particularly in environments with high ambient dust or in households with pets — cleaning is a legitimate permanent fix and the defeatist "just replace it" attitude wastes functional hardware.
Both are right, depending on the case. The diagnostic step (Step 1) exists precisely to help distinguish them. The problem is that most users skip it.
Sony's own engineering choices receive legitimate criticism here: using a potentiometer-based design when Hall effect sensors exist, are reliable, and are only marginally more expensive at scale is a decision that prioritizes BOM cost over product longevity. This is not speculation — Hall effect sticks simply don't drift in the same failure mode. The Xbox Elite Series 2 has had its own drift problems, Joycon drift became a PR and legal nightmare for Nintendo, and every major platform holder continues shipping potentiometer sticks. The engineering argument for Hall effect at the consumer tier has been settled for years. The economic argument against it — a few cents per unit across hundreds of millions of units — is apparently still decisive.
When to Stop and Buy a New Module or Controller
Knowing when to stop is as important as knowing how to proceed.
Stop the calibration process and escalate to hardware replacement if:
- Drift returns within 72 hours of a complete cleaning and firmware reset
- The stick mechanism has visible physical damage (cracked housing, displaced spring that won't reseat)
- Drift is present on both axes simultaneously at rest — this pattern suggests significant potentiometer degradation
- The controller has been repaired more than twice with temporary improvement each time
At that point, the options are: Sony repair service (results vary, warranty implications apply), third-party repair shop with transparent module replacement practices, DIY potentiometer or Hall effect module replacement, or new controller.
The DualSense Edge — Sony's premium controller — uses the same basic stick mechanism but ships with swappable stick modules, which is a tacit acknowledgment that stick wear is expected. The fact that this is a premium feature, rather than a design standard, is its own kind of editorial commentary.